Google Draw How to Make Curved Text
Do you use google docs to create the documents and presentation?
If "Yes", then you most likely want to include Word art into the creation of your document. Word Art is the creative heading that professionals use for their presentation heading.
This Art has been introduced in the 90s with Microsoft Word, back in those it was not very advance and creative for the users.
These days there are many different ways to make a creative Word Art and several different tools are also available, you can also create the word art in Microsoft word and other tools and then copy-paste into the Google docs presentation.
However, we will touch on some of them in this guide. But first, we will look at the inbuilt feature of Word art that comes with Google Docs.
- How To Generate Word Art In Google Docs
- How To Change The Word Art In Google Docs
- Text Color Filling
- Border Weight & Dash
- Fonts Plus Bold & Italic
- How To Rotate Word Art In Google Docs
- Best Way To Create Curved Word Art In Google Docs
- #1. Troygram
- #2. PicMonkey
- How To Upload Curved Text file In Google Docs
- Conclusion
How To Generate Word Art In Google Docs
This is probably the easiest and the fastest way to use and generate WordArt in your document cause hair we are going to use the inbuilt feature of Google docs. Now let's understand how this works:
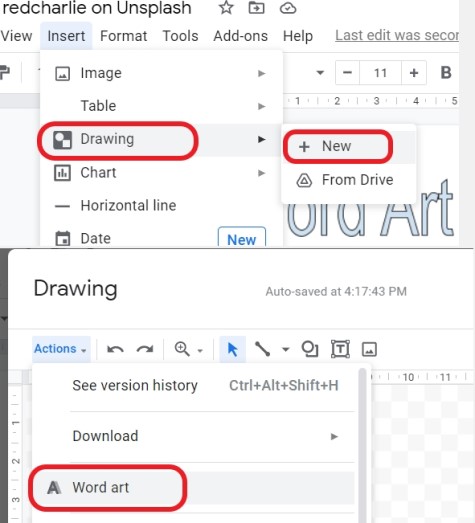
- Open some document in Google Docs.
- Tap on the "Insert" button located in the top header of the Google docs.
- Hover over the "Drawing" Option and Click on the "New" button.
- As you click the button a new window of drawing tool will open, as you see in the screenshot below.
To create Word Art in a drawing popup window you'll have to follow the below steps:
- Click on the "Action" button located at the left side of the drawing window.
- Select the option of "Word Art" from the Drop Down Menu.
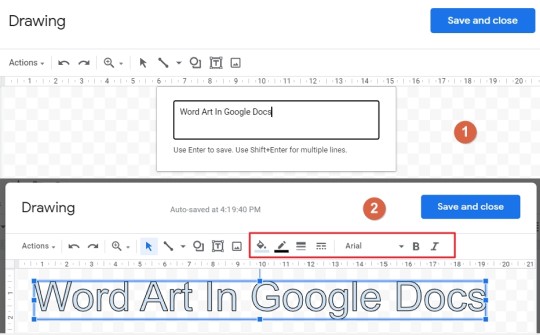
- Now selecting this option will open a text field where you have to enter the text you want in a form of Word art.
- For example we choose the text "Word Art In Google Docs", for typing separately in multiple lines just hit Shift+Enter to create a text line.
- And if your text is just of a line, Hit "Enter" to create Word art in your Google document.
- As you can see below, now you have created a basic word art that appears in your drawing window.
- We can also do several customisation in this basic word art, let's understand how that works.
How To Change The Word Art In Google Docs
There are several inbuilt functions we can use to create and modify the basic word art and to modify it you have to first select the word art, it will be highlighted with the blue color and blue box around the text.
After you select the word art you will have several functions appear on the top header of the drawing window as highlighted in the above screenshot.
In these features are available like Text filling color, Border color & Weight Modify option, you can select different Border dashes and different Google fonts. You can make the fonts Bold & Italic.
Text Color Filling
To fill the color in your word art text, you simply need to click on the colorful icon and the color palette will open. In the below shown, we choose the "Red" color for the text, you can also have the gradient color for your "Word Art" Choice, just switch over to the next tab and select the color.
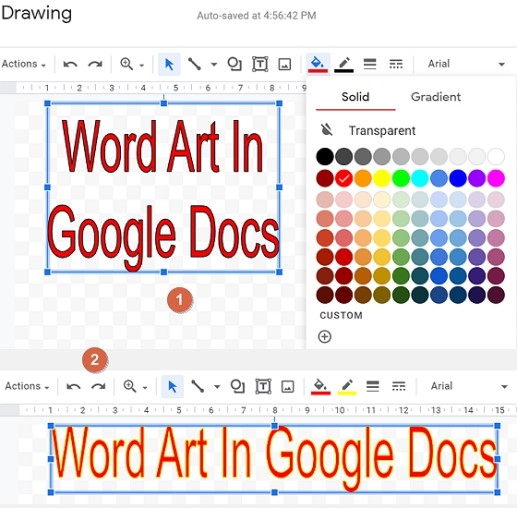
You may have changed the color of the text, but you will notice that the color of the border is not changed yet, to change it we have to select the border color button which is located on the right side of the Color Filling Button. Here we choose the "Yellow" color for the border.
Border Weight & Dash
Now you can also modify the weight & dashes for the border. To change that you have to select the "Dash" button Icon from the menu header of the drawing window. You can choose these from the several different variants available.
Fonts Plus Bold & Italic
As you create the Word Art Google docs will provide them by default font but the good thing is you can change it with few clicks, just select the toggle button of Arial and a drop-down menu will open containing several different Google fonts.

Choosing the correct font will make a huge difference in your Word Art. Here in the Example, we have chosen the font name "Lobster" which seems fine.
Now the last, you can also change the thickness aka the Boldness of your word art plus make it with an Italic look. After the work is done, click on the "Save and Close" Blue button located on the right side of the screen.
How To Rotate Word Art In Google Docs
It is very simple to rotate WordArt in Google docs, the process for rotating any text or heading will be the same no matter if it's a word art for a simple text. Since we are dealing with the word art, we have two ways for the rotation, following will be the steps to follow:
One Way: Predefined Preset
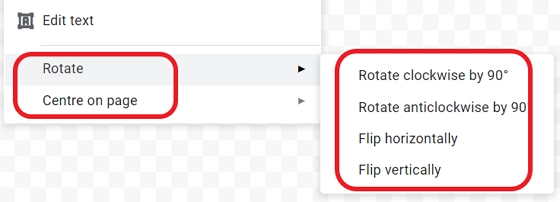
- Select the Word Art by "Clicking" on the text.
- Now Right Click and hover over "Rotate" option from the menu.
- New window will open with four option which comes with preset property.
- Rotate clockwise with 90 degree.
- Rotate anticlockwise with 90 degree.
- Flip Horizontally.
- Flip Vertically.
- You will also have "Center On Page" option in the main menu, hover over it & you will get:
- Horizontally.
- Vertically.
- These option will automaically center the Word Art on the Page and further option will do thier respective job.
Second Way: Free Flow Rotation
We call this method of Free Flow rotation method because in this you don't have any preset rotations, we can rotate our word art in any direction we want, follow below
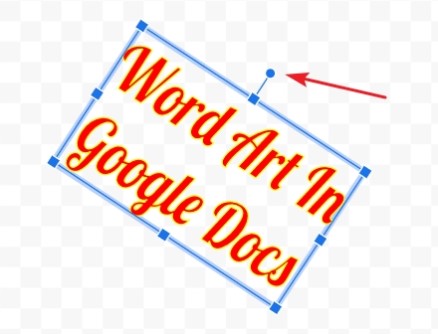
- Just Select the Word Art by Clicking and then hold the Blue dot of the Art box.
- Now the Rotate the text box in any drection you want, there is no boundation of the location.
Now you know the simple way to rotate the Word Art in google docs
Best Way To Create Curved Word Art In Google Docs
Since Google docs do not come with the inbuilt feature of making text curve. We are going to discuss a few ways and tools by which you can create curved text and then copy the text file into a Google Docs block document.
#1. Troygram
Troygram is an online tool that comes with the most simple and user-friendly interface. This tools works fast and enables users to create the curve text with different variety of Google fonts. To create the curved text follow the steps:
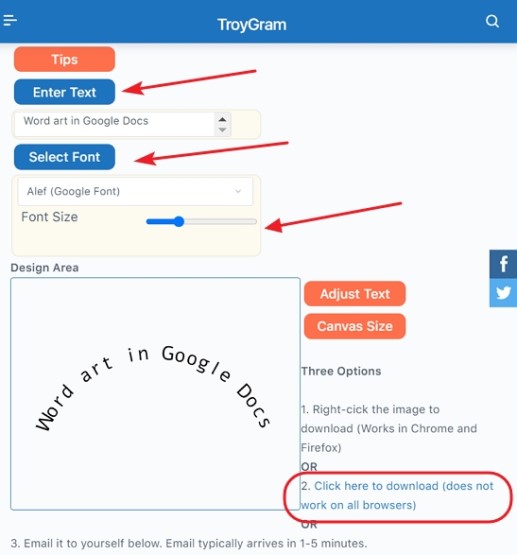
- Click on the "Enter text" button to open the text box.
- Insert your text in the text box. Here for example we have "Word Art In Google Docs" in the text box.
- After the insertion, Click on "Select Font" and you can choose the font size by "Sliding" the button.
- Now you have created the curved Word Art, simply Click on second option to download "Click here to download (does not work on all browsers)".
- And the file will download in your computer hard drive in the format of PNG.
Now that you have saved the file in the PNG format, we will use that file to upload it into Google docs, we will show you that in the latter part, but for now let's take a look at the more advanced tool.
#2. PicMonkey
PicMonkey is an advanced tool that is widely used by uses by digital art forms creators, you can very easily create a curved form of text and add multiple types of customization in styles colors in a just couple of taps.
So Clicks links above to visit the website and follow along:
- Firstly login with your Google or Facebook ID, I would prefer Google ID.
- Once you logged into PicMonkey, it will ask you to pick some pre-made design, you can do that or you can create some custom blank canvas.
- For the blank canvas you can (500*500)px ratio, it would be suffiiencent.
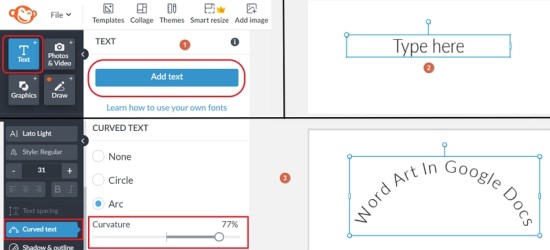
- Now a new canvas will open, Click on "Text" button located at top-left corner of the window for adding the textbar.
- Click on the "Add text" button on Side window.
- It will insert a Text box on the black document, where your can enter your Word Art text.
- Click on the "Curved text" button as shown in the screenshot for creating curved effect, select Arc from the options.
- None
- Circle
- Arc
- You can adjust Curvature by draging the slider, as the percentage increase the curvatur of text will get more curve in shape.
- Also add some style, color and bold fonts to make it more creative.
- Finally you can download this file and upload it to google docs.
- Remeber to downlaod the file, you have to start the 7-day trial for free.
How To Upload Curved Text file In Google Docs
- Open Google docs and create a blank document.
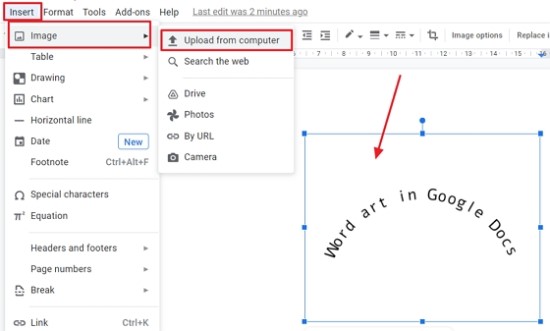
- Click on the "Insert" Tab on the toolbar header.
- Hover over "Image" option.
- Click on "Upload from computer" option.
- Locate the curved text file in your computer and upload it.
- Now you will have your curved text file in Google docs, you can rotate it also can align it anywhere you want on the page.
- Done.
Conclusion
We discussed several different methods of creating word art by making it more creative. We discuss the inbuilt feature of Google docs for creating simple basic word art but since Google docs do not have an additional feature for creating curved text forms, we decided to go through some other third-party tools which are really great at creating curved text and some advanced styling.
We discussed TroyGram and PicMonkey which are two of the most user-friendly tools and both work online so you don't have to install anything on your computer. TroyGram is a simple tool that provides the feature of customizing fonts and their size but on the other hand, PicMonkey is a tool that deals with features of styling and advanced calligraphy art.
Hope you like this in-depth guide on choosing the right tool for creating wonderful word art. Feel free to comment down below your queries we will happy to reply.
Google Draw How to Make Curved Text
Source: https://www.searchinventure.com/2021/07/create-word-art-curved-text-google-docs.html